
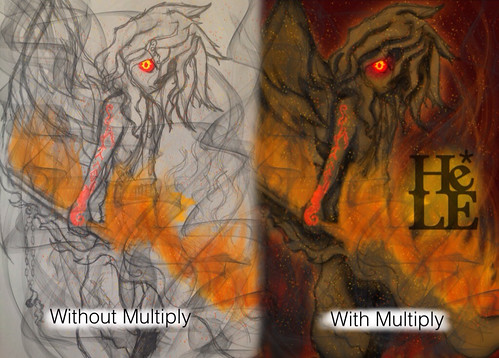
So you love to sketch but can't quite get started on a touch screen. If you find that doodling in graphite pencils, charcoal or ink on a sketchbook or canvas is more your style, it's not hard to transfer onto a tablet to take it to the next level. Most models of tablets can scan using the extremely powerful camera or you can go the old fashioned route and use a scanner, then transfer on board via USB connection. The latter was my option of preference since I painted on my first gen iPad for the longest time and since it was lacking a camera, scanner was my only means. Once imported into your painting app of choice, there are two routes to take. Trace over the sketch in question... Or set the layer to multiply.
For the longest time I was stuck on the stage of artwork where I endlessly sketched but nothing ever felt complete without ink, color or touches. Physically I was always petrified of screwing up an hours worth of work with one simple screw up with pens or paint so I continuously stuck to safe ground and sketched. Such a problem doesn't exist with digital art since you can undo missteps and even paint in layers to protect work already completed. All those years of sketching had left me with a plethora of sketches that I could now import onto my iPad and play about with without destroying the original while giving me the freedom to explore color and effects.
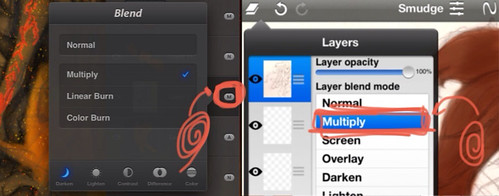
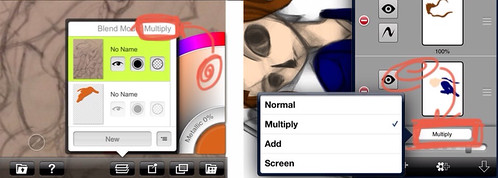
And play about I did. The advantage I had with iPad apps over using desktop powerhouse programs like Photoshop or Painter was that it stripped a lot of daunting features. There is a lot more you can do on the desktop (I have yet to test out the iPad variant of Photoshop) but having nothing but layers and brushes is truly beginner friendly. I highly advise playing about with an iPad + stylus if you want to start getting into digital art. It was through this experimentation that I played with layer effects, one of which is called 'multiply'.
I have no idea where the name derives from but I do know that it makes the white of a layer transparent. With this, all you have to do is add a new layer beneath the scanned picture layer where you can paint to your hearts content.
In case you're curious, the reason why the sketchy one has color on top is because I wanted intense colors from the flames above the lineart.
No comments:
Post a Comment